The HRMS module of iFMS is featured with a new feature of Arrear Bill. Using this functionality, Arrear/ Supplementary Bill can be prepared.
Please Note the difference between Arrear payment and Supplementary payment
Arrear payment is an outstanding payment for a period that accrues when a difference arises between payment (Due) and payment (Drawn). It is important to note that there must have been a drawal and disbursement of fund by the competent authority and it was paid to the incumbent, but such payment turns out to be lesser than the amount becoming due at a later date.
For example: Mr. X, an employee, upon being given a functional promotion, gets an upward pay revision with effect from an early date and his pay stands revised for a period spanning 6 months. It is found that he has duly drawn his salaries for that period. But since his pay got revised and consequently it enhanced, an arrear accrues for this period and he is entitled to get the arrear as the due becomes greater than drawn.
Supplementary payment, on the other hand, is an outstanding payment to be made for a period in which no fund was drawn and disbursed. It is worth mentioning here that unlike arrear payment, no fund should have been drawn for the period for which the payment becomes due.
For example: Ms. Y, an employee, has not been paid her salary for the month of October 2019 as she was purportedly on EOL (extra ordinary leave). Her leave on being regularized by competent authority subsequently, say in December 2019, she becomes entitled to supplementary payment of her salary for the month of October 2019.
Steps for Arrear/ Supplementary Bill preparation:
1. Log in to HRMS module with your iFMS Id and Password.

2. Under the main menu, click on Arrear.
3. Under the arrear menu click on Statement Generation. The Arrear/ Supplementary Statement Generation page is displayed.
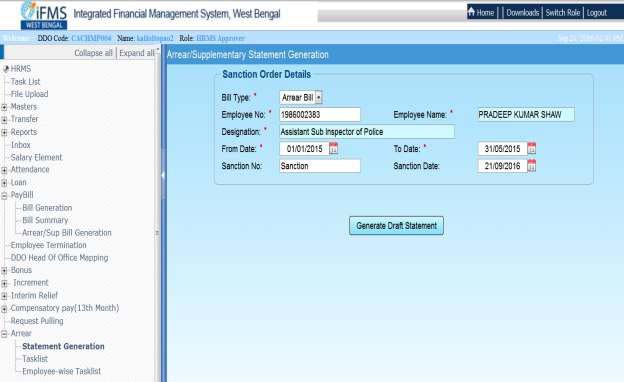
4. Select the Bill Type from the drop down box. Manually enter the Employee No. for whom the Arrear Bill has to be prepared. The employee Name and Designation of the employee is automatically displayed. Manually select the From Date and To Date from the Calendar menu. Manually enter the Sanction No. and Sanction Date and click on Generate Draft Statement button.
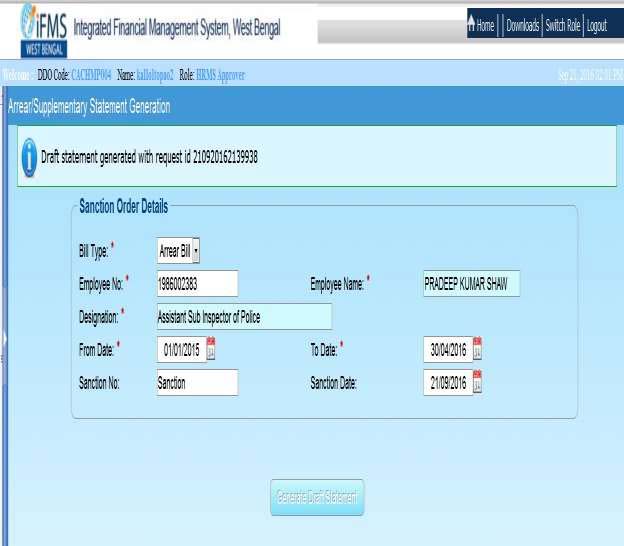
A draft statement is generated and a Request Id is displayed at the top.
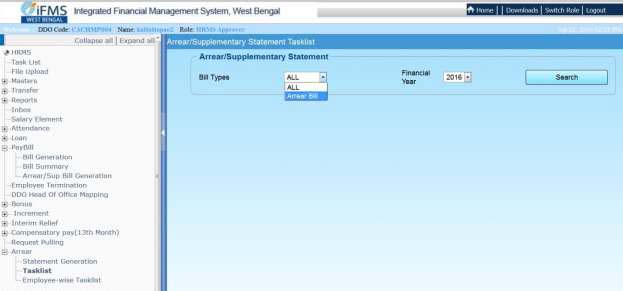
5. Click on Tasklist under Arrear menu. Select the Bill Type from the drop down menu and click on Search button.
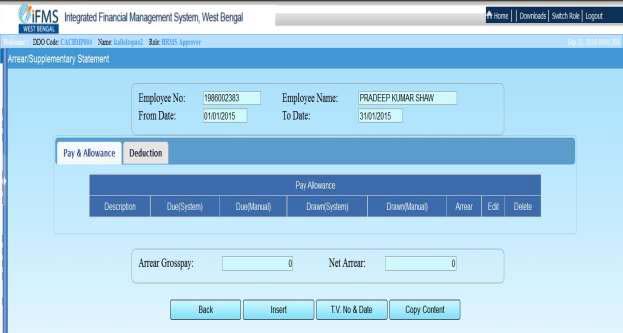
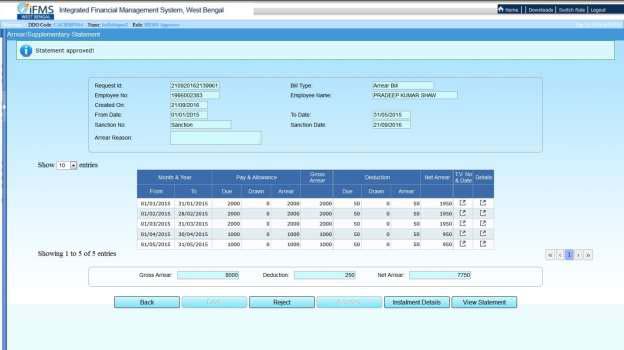
6. The Arrear/ Supplementary Statement of the employee is displayed along with the Request ID, Bill Type, Employee No., Employee Name, Created On, From Date, to Date, Sanction No. and Sanction Date all non-editable fields and a manual editable field Arrear Reason.
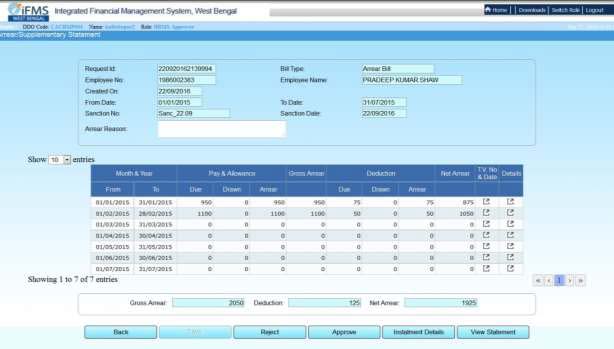
The details of the paybills which were prepared and fully processed, upto voucher generation through the HRMS module will be automatically displayed, i.e Pay & Allowance and Deductions and for other bills that were not processed through HRMS, the details will have to be entered manually.
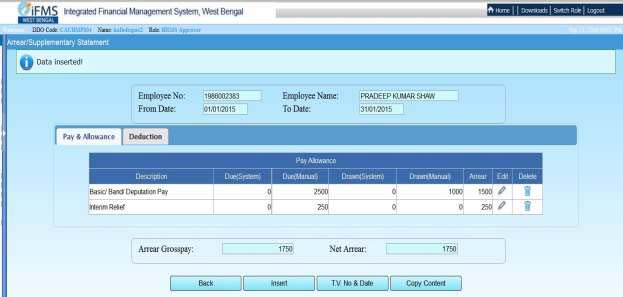
7. To Edit/ Update the various Arrear Components of the employee click on Details icon at the end of each row. A new page is displayed as in fig. 6.
8. Click on Insert. A pop up is displayed.
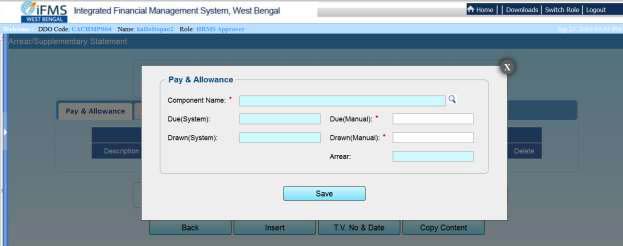
9. Click on the Component Name Lov.
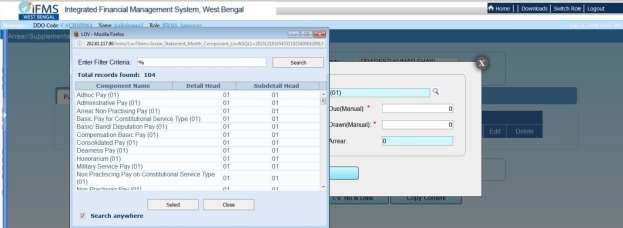
A pop is displayed.
10. Select the components one by one for which the arrears needs to be provided.
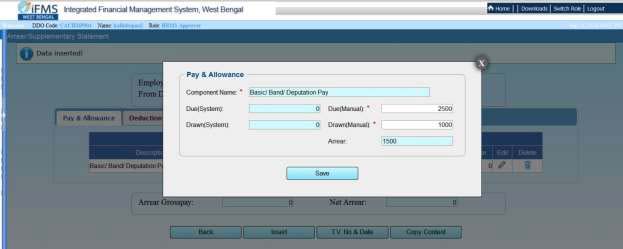
11. Manually enter the Amounts Due and Amounts Drawn in the respective fields if any modification is required.
12. Click on Save.
A success message will be displayed at top.
Manually select all the components for which Arrear/ Supplementary is to be provided.
13. Click on Deduction Tab. Manually enter the Amounts Due and Amounts Drawn as shown above.
Note: If same data needs to be entered into the system a no of times, instead of entering the same data repeatedly, you can copy the data by clicking on the Copy Content Button and paste the data on all the fields
14. Click on Copy Content. A pop up will be displayed.
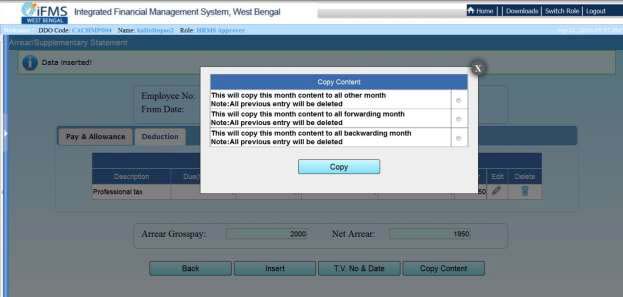
15. Click on the applicable choice in the bulleted field and click on Copy Button.
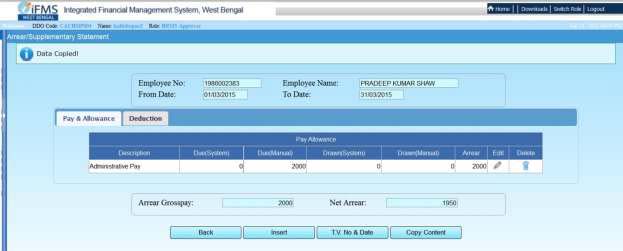
A success message will be displayed at top.
N.B.:- If you select the first option, then the data copied will be pasted on all the entries and will over write any previously existing data.
If you select the second option then the data copied will be pasted on all the rows below the row from where the data was copied and will over write any previously existing data.
If you select the third option then the data copied will be pasted on all the rows above the row from where the data was copied will over write any previously existing data.
16. Click on TV No. & Date button. A pop up is displayed.
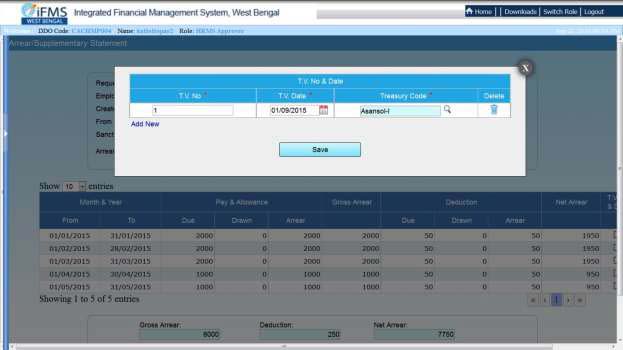
17. Manually enter the TV No., select the TV Date from the calendar field and select the Treasury from Lov for all the entries, if already not present.
18. Click on Save button.
19. Click on Installment Details. A popup will be displayed.
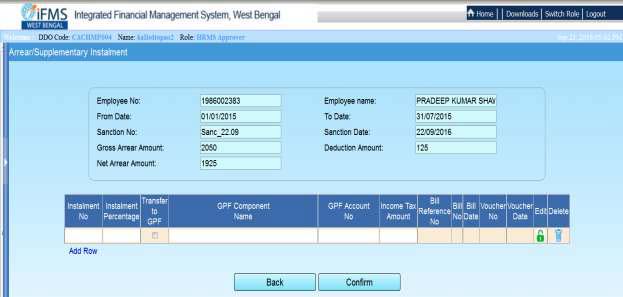
20. Manually enter the Installment No. (i.e. 1 for 1st Installment, 2 for 2nd Installment, 3 for 3rd., Installment).
21. Manually enter the Installment Percentage (The total percentage of all the rows must not exceed 100%).
22. Check the Transfer to GPF check box, if the Installment needs to be transferred to the GPF A/c of the employee.
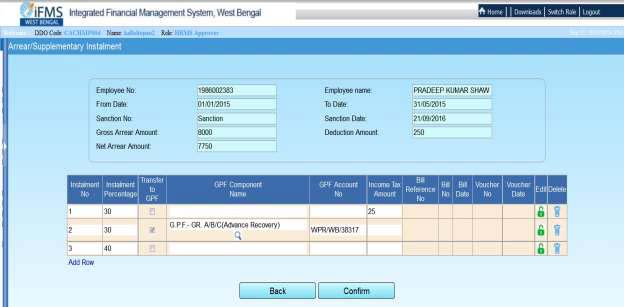
23. After checking all the data click on Confirm.
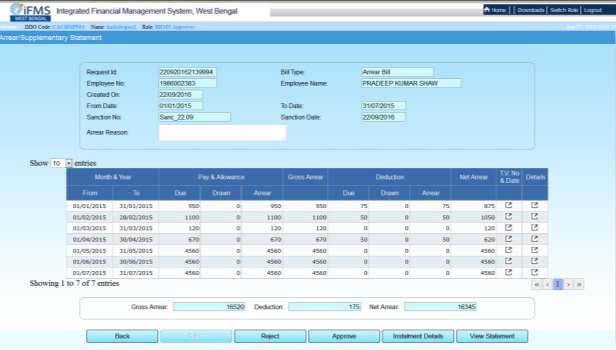
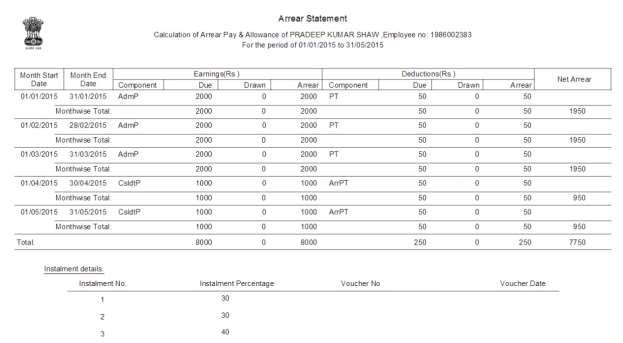
24. Click on View Statement to view the details.
25. Click on Approve button as shown in Fig 16, to approve the whole list.
A success message will be shown on top.
For Transferred employees:
For employees who have been transferred to some other office, either the arrear statement has to be rejected from the previous DDO or the arrear statement has to be approved to make it available in the new DDO office. Apart from this, all the necessary transfer steps like LPC Out, Release Out, in the previous office and Joining in and LPC In has to be completed in the new DDO office.
26. Under the arrear menu, click on Employee- Wise Tasklist
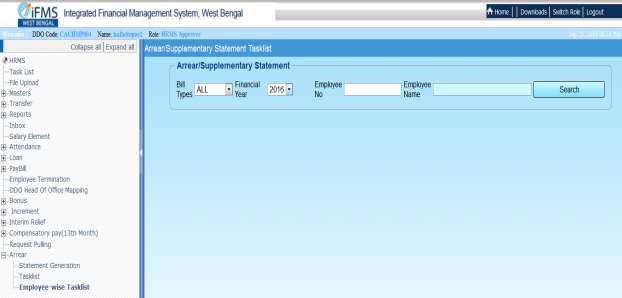
27. Select the Bill Types from the drop down menu, Financial Year from the drop down menu, manually enter the Employee No, Employee Name and click on Search Button.
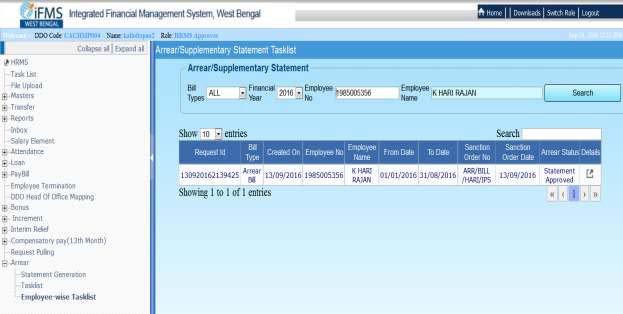
The already approved arrear statement for the selected employee is displayed.
28. Click on Details to check or update any arrear details of employee.
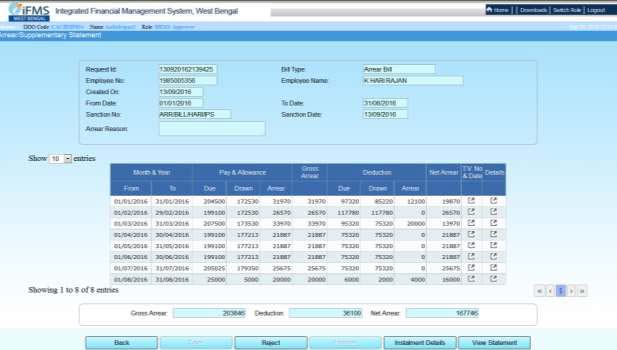
After completing the steps, click on Approve button to approve Arrear Statement Arrear/ Supplementary Bill Generation
29. Under the main menu, click on Pay Bill and then on Arrear/Sup Bill Generation.
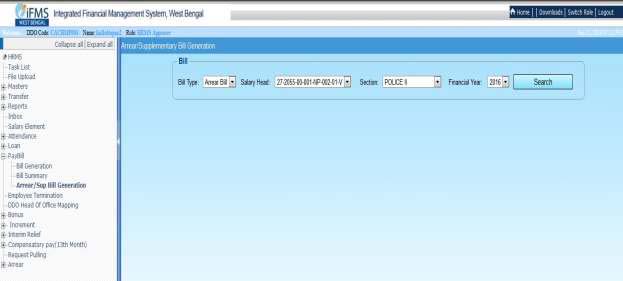
30. Select the Bill Type, Salary Head, Section, Finance Year from the respective drop down box and click on Search button.
The employee under the search criteria, for whom statement is generated and approved, is displayed.
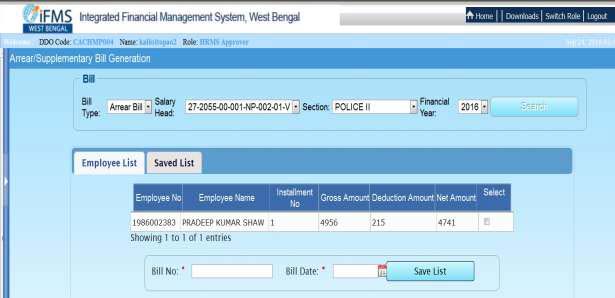
31. Click on the Select check boxes for the rows that will be under the same Bill No.
32. Manually provide the Bill No. and select the Bill Date from calendar field and click on Save List.
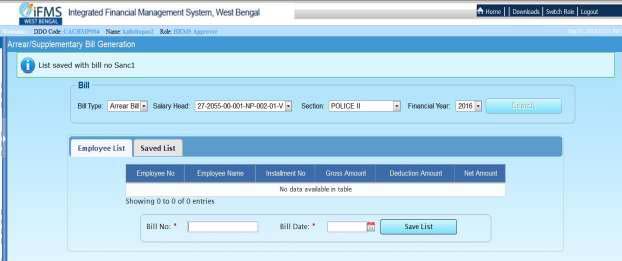
A success message is displayed at top along with the Bill No.
This Bill prepared is for Installment No 1, that was provided in the installment details page as shown in Fig- 15
33. Similarly for all the rest installments, again click on Pay Bill and then on Arrear/Sup Bill Generation ( As shown in Fig 22). The employee under the search criteria, for whom statement is generated and approved, is displayed.
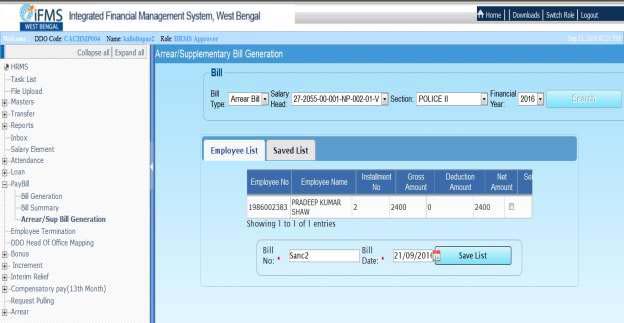
34. Select the Bill Type, Salary Head, Section, Financial Year from the respective drop down box and click on Search button ( As shown in Fig 23). The employee under the search criteria, for whom statement is generated and approved, is displayed.
35. Click on the Select check boxes for the rows that will be under the same Bill No.
36. Manually provide the Bill No. and select the Bill Date from calendar field and click on Save List.
After completing the steps for all the approved statements,
37. Click on Saved List.
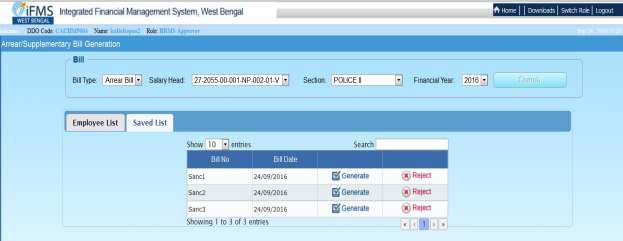
All the Saved Arrear Bill are displayed.
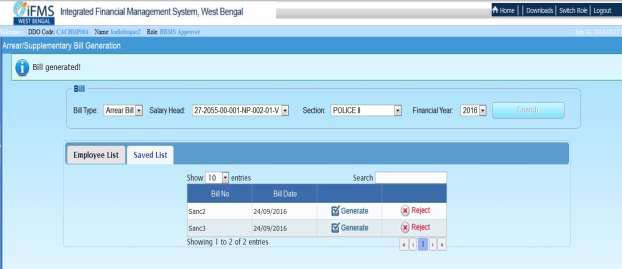
38. Click on Generate for all the entries to process bills or Click on Reject to cancel the Bills. A success message is displayed and the Bill No is removed from the list.
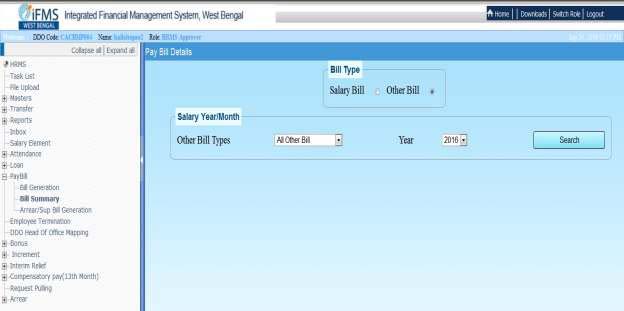
39. Under the Paybill menu, Click on Bill Summary and then select Other Bill
40. All the Arrear/ Supplementary Bill generated are displayed.
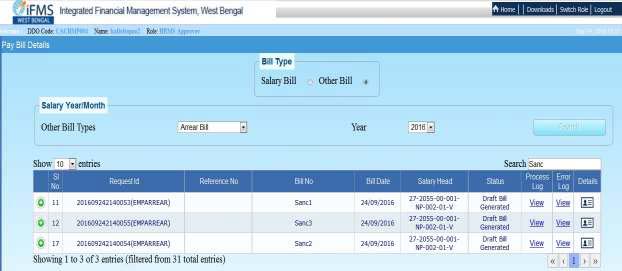
41. Click on Details, to view the details of the bill.
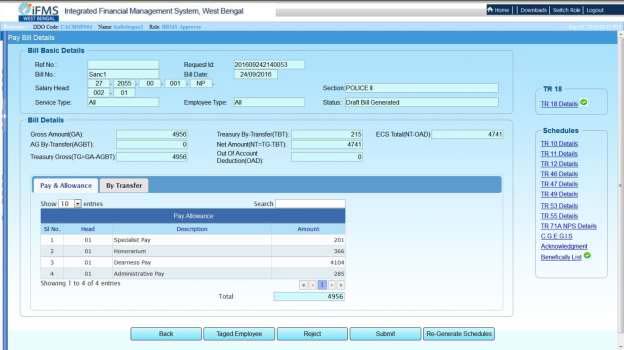
42. Click on Tagged Employee to view the details of the employees tagged with this bill or you can Reject the bill altogether by clicking the Reject Button or you can Submit the Bill, by clicking the Submit button.
N.B.- While submitting the bill to the Treasury, DSC must be inserted in the system.
If the work is done in the operators login, then the same has to be forwarded to the Approver’s Login, in order to be processed by the Approver.